Android: Spinner-Like UI for Selecting Multiple Options

Download the source code files AndroidMultipleChoice.tar.gz (tar.gz, eclipse project)
Android includes a Spinner control that works very much like a desktop drop-down (or combo-box) control. Tapping a Spinner presents a list of options, and allows the user to select one from the list.
However, in building a small research app, I needed to allow users to select multiple items from the Spinner's list. From what I could see, though, the Spinner class is not capable of doing this, so I built a small throwaway app that implements this oft-requested functionality.
Getting Started
Spin up a new Android application in Eclipse, creating an activity named MultipleChoiceActivity. For reference, I'm targeting the Google Android 2.1 APIs (Level 7).
Once the project is created, open up and edit the main.xml file to display a simple label and button. I've used a Button instead of a Spinner as we can change the button's label to indicate which options have been selected:
<!-- res/main.xml -->

<?xml version="1.0" encoding="utf-8"?>

<LinearLayout xmlns:android="http://schemas.android.com/apk/res/android"

  android:layout_width="fill_parent"

  android:layout_height="fill_parent"

  android:orientation="vertical"

  android:padding="5dip">

  <TextView

    android:text="Select Colours"

    android:id="@+id/textView1"

    android:layout_width="fill_parent"

    android:layout_height="wrap_content"

    android:padding="5dip" />

  <Button

    android:layout_height="wrap_content"

    android:layout_width="fill_parent"

    android:text="- None Selected -"

    android:id="@+id/select_colours"

    android:padding="5dip" />

</LinearLayout>
Building the Activity
For this example, I'm using a hard-coded list of colours here in this example (rather than, for example, hooking up to a database). Start by hooking up the interface to properties in MultipleChoiceActivity.java:
// src/com/example/multiple_choice/MultipleChoiceActivity.java

// ... package, imports ...

public class MultipleChoiceActivity extends Activity implements OnClickListener {

  protected Button selectColoursButton;

  protected CharSequence[] colours = { "Red", "Green", "Blue", "Yellow", "Orange", "Purple" };

  protected ArrayList<CharSequence> selectedColours = new ArrayList<CharSequence>();

  @Override

  public void onCreate(Bundle savedInstanceState) {

    super.onCreate(savedInstanceState);

    setContentView(R.layout.main);

    selectColoursButton = (Button) findViewById(R.id.select_colours);

    selectColoursButton.setOnClickListener(this);

  }

  @Override

  public void onClick(View view) {

    switch(view.getId()) {

      case R.id.select_colours:

        // TODO: Show the colours dialog

        break;

      default:

        break;

    }

  }

}
With that code, your button is now hooked up to listen for clicks. The colours array is a simple list of colours that will be displayed when we click the button. The selectedColours ArrayList is a dynamic array of the colours that have been selected. Using ArrayList lets us easily add and remove colours when the user changes the selection.
Try running the app in the Android emulator (or on a device) to check that everything works so far.
Displaying the Options
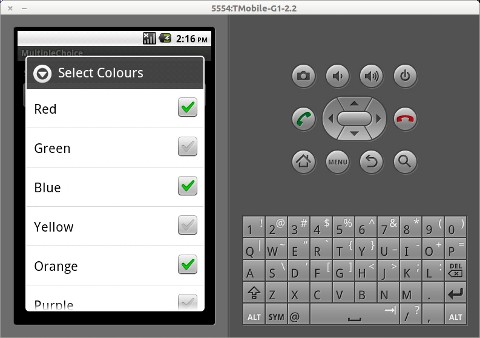
Next, we'll use Android's AlertDialog to let us display the list of colours, and allow the user to make selections. AlertDialog comes with built-in functionality to allow multiple selections, and automatically adds checkboxes to our list interface.
Add the following method to MultipleChoiceActivity.java:
// src/com/example/multiple_choice/MultipleChoiceActivity.java

protected void showSelectColoursDialog() {

  boolean[] checkedColours = new boolean[colours.length];

  int count = colours.length;

  for(int i = 0; i < count; i++)

    checkedColours[i] = selectedColours.contains(colours[i]);

  DialogInterface.OnMultiChoiceClickListener coloursDialogListener = new DialogInterface.OnMultiChoiceClickListener() {

   @Override

    public void onClick(DialogInterface dialog, int which, boolean isChecked) {

      if(isChecked)

        selectedColours.add(colours[which]);

      else

        selectedColours.remove(colours[which]);

      onChangeSelectedColours();

    }

   };

  AlertDialog.Builder builder = new AlertDialog.Builder(this);

  builder.setTitle("Select Colours");

  builder.setMultiChoiceItems(colours, checkedColours, coloursDialogListener);

  AlertDialog dialog = builder.create();

  dialog.show();

}
showSelectColoursDialog is the method that will be called when tapping the button. It starts by walking through the colours array and checking which colours are already in the selectedColours ArrayList. The results get stored in an array of booleans (checkedColours) that will be used by the AlertDialog to determine which items in the list are to be checked.
Next, we build a DialogInterface.OnMultiChoiceClickListener that will be invoked when the user checks or unchecks a colour in the list. Depending on the state of the check box (supplied via the isChecked parameter), we add or remove the colour from the selectedColours ArrayList.
Notice that when the listener is finished, we call an as-yet undefined method, onChangeSelectedColours. This will be a callback method that we'll use to update the button's label:
// src/com/example/multiple_choice/MultipleChoiceActivity.java

protected void onChangeSelectedColours() {

  StringBuilder stringBuilder = new StringBuilder();

  for(CharSequence colour : selectedColours)

    stringBuilder.append(colour + ",");

  selectColoursButton.setText(stringBuilder.toString());

}
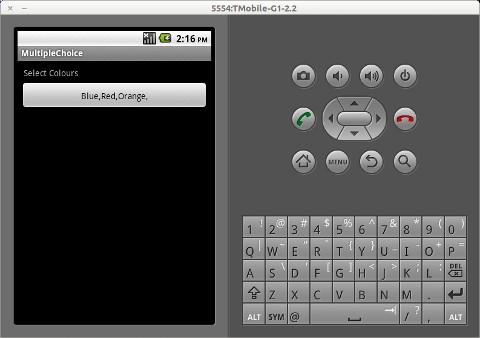
This simple callback method just walks through the ArrayList of selected colours, and builds a string containing the name of each colour.
Finally, all that's left to do is hook up our button to call showSelectColoursDialog in the onClick method we overrode earlier:
// src/com/example/multiple_choice/MultipleChoiceActivity.java

@Override

public void onClick(View view) {

  switch(view.getId()) {

    case R.id.select_colours:

      showSelectColoursDialog();

      break;

    default:

      break;

  }

}
With everything hooked up, it's time to test out the app. Run the emulator (or install to a device), tap the button and you'll be able to select multiple colours from the list. If you tap the back button, the list will close, and your button's label will have updated to show the colours you tapped. Try tapping the button again, and your previously selected colours will still be checked.

Summary
Hopefully this simple example will be useful to anyone looking to implement multiple-choice options. It would be nice to use the Spinner gadget rather than a Button, perhaps by subclassing Spinner and overriding it's click handler and label drawing methods. I haven't tried this - let me know in the comments if you decide to give it a go.